Windows found errors on this drive that need to be repaired
Your PC/Device needs to be repaired в Windows 10 — что делать?
При включении своего ПК пользователь может столкнуться с «синим экраном смерти», на котором размещено сообщение «Your PC/Device needs to be repaired». Обычно это означает, что системная область загрузки ОС Виндовс на диске повреждена, и нуждается во вмешательстве пользователя для нормализации своей работы. Ниже я разберу, что это за проблема, каковы её причины, а также как исправить ошибку PC needs to be repaired в Windows 10 на вашем компьютере.
Перевод и причины ошибки в Виндовс 10
В переводе текст ошибки звучит так «Ваш ПК/Устройство нуждается в восстановлении». Несмотря на то, что данная ошибка встречается в большинстве современных ОС, наиболее часто вы можете её увидеть при загрузке модерной Виндовс 10. Обычно в сообщении об ошибке также находится код данной ошибки (0xc000000f, 0x0000098, 0xc000014C, 0xc0000034, 0xc0000225 и др.), рекомендации использовать установочные носители типа флешки и обратиться за помощью к администратору ПК.
Вызывающими ошибку Your PC/Device needs to be repaired факторами обычно являются повреждение или отсутствие необходимых для загрузки ОС системных файлов. В частности, это может быть следующее:
Как исправить Your pc/device needs to be repaired при установке Windows 10
Чтобы избавиться от ошибки «Your PC/Device needs to be repaired» необходимо иметь в своём распоряжении загрузочную флешку с Виндовс 10. Если вы не знаете, как создать таковую, рекомендую обратиться к видео:
После того, как вы создадите такую флешку, выполните следующее:
Способ №1. Задействуйте восстановление системы
Подключите вашу инсталляционную флешку с Виндовс 10 к ПК, включите ваш компьютер, и с помощью нажатия на F2 (или F10) перейдите в его БИОС. Там найдите опцию установки очерёдности загрузки устройств, и установите ваш флеш-накопитель первым в списке. Сохраните изменения (обычно с помощью нажатия на F10), и перезапустите ваш компьютер.
Начнётся загрузка Виндовс с флешки. Выберите язык и регион, нажмите «Далее».

На последующем экране внизу слева кликните на «Восстановление системы».
Далее выберите «Поиск и устранение неисправностей», а затем «Восстановление при загрузке» (при необходимости далее выберите Виндовс 10). Начнётся восстановление загрузочных параметров, и ошибка PC needs repaired будет решена.
Способ №2. Используйте функционал командной строки
Выполните все действия, перечисленные в способе №1, но вместо выбора опции восстановления при загрузке выберите «Командная строка». В открывшемся экране командной строки поочерёдно наберите нижеприведённые команды:

Читайте также: System thread exception not handled в Windows 10 — тут.
Способ №3. Обратитесь к функционалу «Partition Guru»
Ещё одним вариантом решения проблемы «Your PC/Device needs to be repaired» является задействование специализированного софта для восстановления жёсткого диска, к примеру «Partition Guru». С помощью данной программы можно создать загрузочный флешку, загрузиться с неё, а затем и исправить системную область на винчестере вашего PC.
Загрузите «Partition Guru», выберите там вкладку «Disk», в ней – «Rebuild Master Boot Record», после чего нажмите на «Y» (Yes). Программа исправит возникшую проблему, после чего вам останется перезагрузить ваш ПК в обычном режиме.
Заключение
Основной причиной, вызывающей данную дисфункцию, является нарушение структуры загрузочной области Виндовс 10, а также повреждения важных системных файлов. Эффективным решением проблемы обычно становится задействование шаблонного алгоритма восстановления Виндовс 10, а также выполнения в командной строке служебных команд, перечисленных мной выше. Задействование данных инструментов позволит эффективно решить проблему «Your PC/Device needs to be repaired» Виндовс 10 на вашем ПК.
Disk Error Checking: How to run CHKDSK in Windows 10
Users of Windows 10/8 may have noticed that Disk Error Checking is a bit different from the earlier versions of Windows. Checking your hard disk, every once in a while for errors – usually caused due to improper or sudden shutdowns, corrupted software, metadata corruption, etc., – in Windows 7 and earlier is always a good practice as this can help solve some computer problems and improve the performance of your Windows computer.
Disk Error Checking in Windows 10
The disk is periodically checked for file system errors, bad sectors, lost clusters, etc., during Automatic Maintenance and you now no longer need to really go and run it. In fact, Windows 8 now even exposes the state of the file-system and disk via the Action Center or under the Drive properties in File Explorer. If potential errors are found, you will be informed about it. You can continue to use the computer, while the scan is carried out in the background. If errors are found, you may be prompted via a notification to restart your computer.
Windows found errors on this drive that need to be repaired
At times you may see a message – Windows found errors on this drive that need to be repaired. If you see it, you may want to manually run a scan. Earlier you had to schedule Disk Error Checking for the system drive and for drives which had files or processes or folders opened. In Windows 10/8, error checking starts right away, even on the system drive – and it longer needs to be scheduled at start-up. Only if some errors are found, will you have to restart to let Windows 10/8 fix the errors.
How to run CHKDSK in Windows 10
If the system detects that there are errors, you will be asked to check the disk. If no errors are found, you will see a message – You don’t need to scan this drive. You can, nevertheless, choose to check the drive. Click on Scan drive to do so.
The scanning starts. I found that the process ran quite fast and the scanning was over in less than 5 minutes.
On completion, Windows will display a message. If no errors are found it will say so.
If errors are found, you will see the following message:
Restart your computer to repair the file system. You can restart right away or schedule the error fixing on next restart.
When I clicked on Show Details, the Event Viewer sprang to life, showing me the relevant log.
In Windows 8/10, Microsoft has made the Disk Error detection and correction of file system errors less intrusive so that users can carry on working on their computers without worrying about such error.
To run Check Disk on your System Drive (C), using the command line, type the following and hit Enter:
Windows was unable to repair the drive: How can I fix that?
Windows OS comes with a built-in System File Checker and Disk Checker utility. If the OS detects a corrupt or malfunctioning of the drive, it will ask you to run CHKSDK utility to fix the drive.
The tool has a pretty good record of repairing minor corruption and missing problems with the hard drive. However, at times the built-in diagnostic tools may fail to repair the drive and show “Windows was unable to repair the drive” error.
The full error reads the following:
Error check – Example hard-drive
There was a problem repairing this drive. Windows was able to repair the drive. Close this dialogue box, and then try to repair the drive again.
This is error can occur with your external as well as internal drive out of the blue.
A quick solution to this error is to restart your PC without the hard drive or USB drive and connect it after the PC restarts. If the internal hard drive has this error, see if a quick restart can fix it.
If a quick restart doesn’t fix the error, follow the solutions in this article that will help you fix the problem on your Windows device.
How to fix ‘Windows was unable to repair the drive’ errors
Note that some of these fixes require you to be able to login to Windows. If you are unable to log in or if the boot process fails, you can try to boot Windows into Safe Mode.
Safe Mode is a diagnostic mode in Windows OS that helps you to clean boot the PC with absolute minimal services running to boot the computer successfully. This way, if software or driver is conflicting with the booting process, you can log in without the error for diagnostic purpose.
Here is how to boot Windows into Safe Mode.
If you can log in to Windows:
If you can see the lock screen:
After your PC restarts, you should see a list of option. Press 4 or F4 on your keyboard to start PC in Safe Mode.
If you can’t log in to Windows:
Windows will show a Recovery menu if it fails to boot normally three times over. You can manually interrupt the boot process by pressing the Power button when Window starts to boot.
During next restart, Windows will show Preparing Automatic Repair screen and then asks you to select a user account. Windows will try to diagnose the issue and present you with an Automatic Repair screen.
Now that you know how to boot into Safe Mode let’s dive in and look at the solutions to fix Windows was unable to repair the drive error.
Solution 1: Run Check Disk tool from the Command Prompt
The first solution is to run the check disk tool again but manually from the Command Prompt.
Open Command Prompt as admin. To do this, type cmd in the search/Cortana bar, right-click on Command Prompt and select Run as Administrator.
In the command prompt, type the following command and hit enter. Make sure that you enter the right drive letter first and then enter the command.
E.g., If the problem is with an external hard drive with the Drive letter E, type E: and hit enter. Next, enter the below command.
In the above command /r locates bad sectors and recovers data where possible and /f force the drive to dismount before beginning the scanning process.
Wait for the check disk process to complete. Windows will automatically scan and fix the drive for any error and corruption issues.
Solution 2: Run a Diagnostic Tool
Assuming that the disk error is occurring due to your external hard drive, you can use any diagnostic tools to pinpoint the problem and fix the bad sectors.
Some hard drive makers like WD offer their own diagnostic tools. If not, you can always use third-party software like HDDScan or CrystalDiskInfo, etc. to run and test the drive for errors.
Error: «Repair this drive. Windows found errors on this drive that needs to be repaired. Close this dialog box, and then repair the drive.»
«Repair this drive. Windows found errors on this drive that needs to be repaired. Close this dialog box, and then repair the drive.» Only option is to close.
So how do I repair the drive?
Original title: Windows 8.1 can’t fix HD errores
Replies (4)
Thank you for posting your query in Microsoft Community.
I can understand the inconvenience you are experiencing with the hard drive and will certainly help you in the right direction to fix the issue.
As per the error message, I would suggest you to try performing a check disk operation from the Windows Advanced options and then check if the hard driver errors are fixed. To do so, I would suggest you to boot the system from a Windows 8 installation medium and then try running «chkdsk» from the advanced options.
If you do not have Windows 8 installation DVD, you may have to create one, boot the computer from it and then perform the following steps. To create installation media, you may refer to the article given below:
After creating the disc, refer to the following steps:
a) Boot from the Windows 8 installation disk.
b) In the “Windows Setup” dialog box that appears, set the Time and currency format, Keyboard or input method and the language to install and then click “Next”.
c) Click on “Repair your computer” from the lower left corner.
d) From the “Choose an option screen”, click on “Troubleshoot”.
e) Click “Advanced Options” in the “Troubleshoot” screen.
f) In the “Advanced Options” screen, select “Command Prompt”.
g) In the command prompt, type chkdsk followed by one or a combination of switches listed in step b and c.
Note 1: You need to perform check disk operation on C: drive. So, the command to switch to C: drive would be chkdsk c: and followed by switches as given in the steps further.
b. /f = The /f switch is the most common of the chkdsk switches. It tells chkdsk to try and fix any errors it finds.
Note 2: Answer Y when chkdsk asks you if you want to check the drive next time Windows 7 boots (restarts).
c. /r = The /r switch tells chkdsk to attempt to recover any bad sectors of the hard drive if any are found. A bad sector is a spot on the hard drive that cannot hold saved data anymore.
Note: Answer Y when chkdsk asks you if you want to check the drive next time Windows 7 boots.
Warning: If check disk finds any bad sector, the data on the sector would be lost.
Hope this information is helpful. Do let us know if you need any further assistance, we’ll be glad to assist you.
Fixed: Restart To Repair Drive Errors On Windows 10 [MiniTool Tips]
By Sarah | Follow | Last Updated March 03, 2021
Summary :
Have you ever seen the Restart to repair drive errors on your computer? Do you want to repair the drive errors on your own? If your answers to both questions are yes, the following content talking about how to get back data from the problematic drive and how to fix the repair drive errors will be much helpful. Please get moving now!
Quick Navigation :
What Does Restart to Repair Drive Errors Mean
When running into some problems on the computer, users tend to try to fix it by restarting the PC. Similarly, when any problems are found by the error checking tool (whose main function is scanning and repairing drive), the system will suggest you to restart to repair drive errors.
As you can see from the above picture, the Restart to repair drive errors (Click to restart your PC) message will appear in the action center on a Windows 10 computer. What does this error mean exactly? To be precise, this error indicates the following things:
The Restart Repair Error Is Annoying
If you do click to reboot your computer, you may get the following result:
The second result may drive you crazy (see above picture), right? Undeniably, the Windows disk errors are quite a common thing; that’s why there’s a disk diagnostic tool built in all the Windows systems to scan and fix disk errors (check the integrity of your hard disk and fix various errors like file system error). Yet, it becomes annoying and equally devastating when the problems can’t be fixed after you have done what Windows suggests you do – restart your computer.
Taking a look at the error again, you’ll find that your data on the target drive may get lost since Windows says To prevent data loss, repair this drive now. On this occasion, I advise you to recover data from the drive that needs to be repaired after you have tried a reboot and failed. Then, you may try the feasible methods that’ll be mentioned later in this article to fix the reboot to repair drive error.
How to Recover Data When Windows Asks You to Repair This Drive
Since Windows won’t allow you to access the drive until the repair this drive error has been fixed, you can’t copy files from it to keep data safe. In this case, you should recover data from the inaccessible drive with reliable data recovery software. Another way to ensure data security is to make a data backup with powerful backup software.
Attention. If your drive turns into RAW suddenly and you can’t access it, please read this to know how to do the recovery:
With the powerful tool I recommend in this article, every one of you is able to recover data from RAW hard drive without troubles.
In the following content, I’ll mainly focus on telling you how to recover data with the amazing recovery tool.
Data Recovery Steps
Step one: get the setup program of a reliable tool – download it properly. Then, click on the setup application to run the installation process and follow the instructions to complete installing the tool.
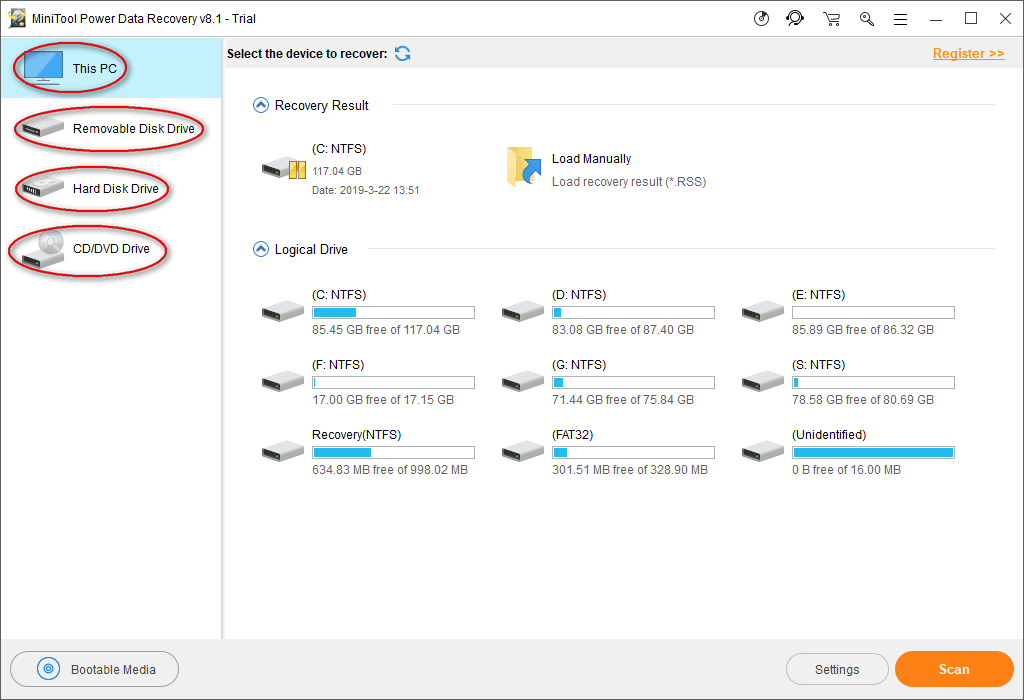
Step two: run the recovery tool and you’ll be brought to its main window after a quick disk loading process.
Step three: you’ll see four options located on the left side of the software main window: This PC, Removable Disk Drive, Hard Disk Drive, and CD/DVD Drive. Please select the drive that is most suitable for your case.
Please remember to connect the drive to the computer before running the recovery tool if it is a removable/external/portable one.
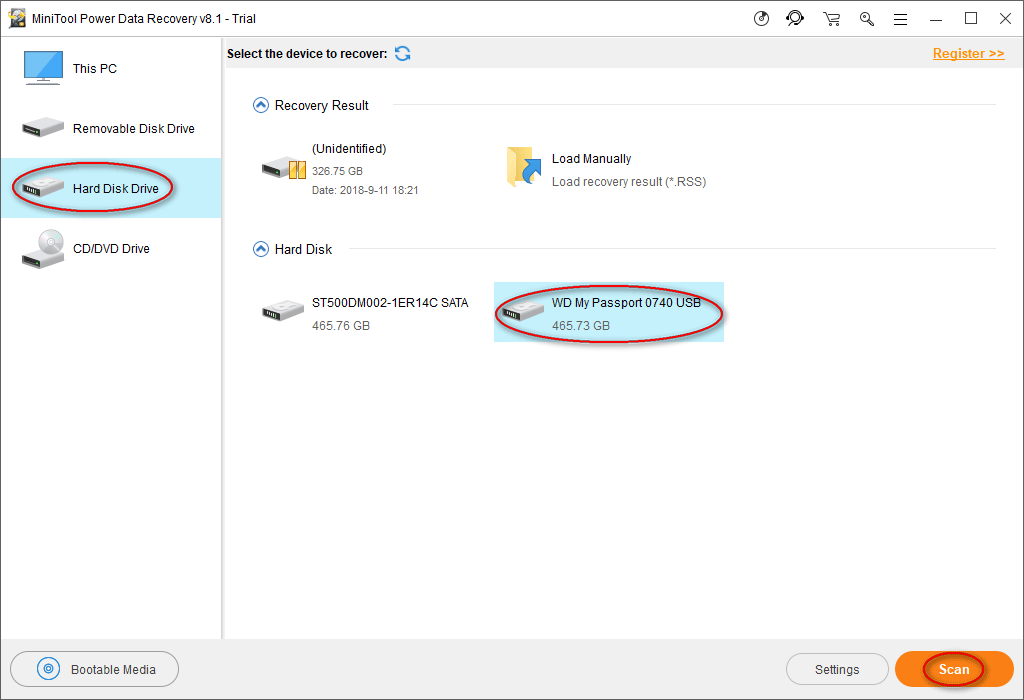
Step four: find the drive on which the restart to repair drive error appears. Then, double click on it or single click on the Scan button to start the drive scanning process (it will be initialized immediately after clicking).
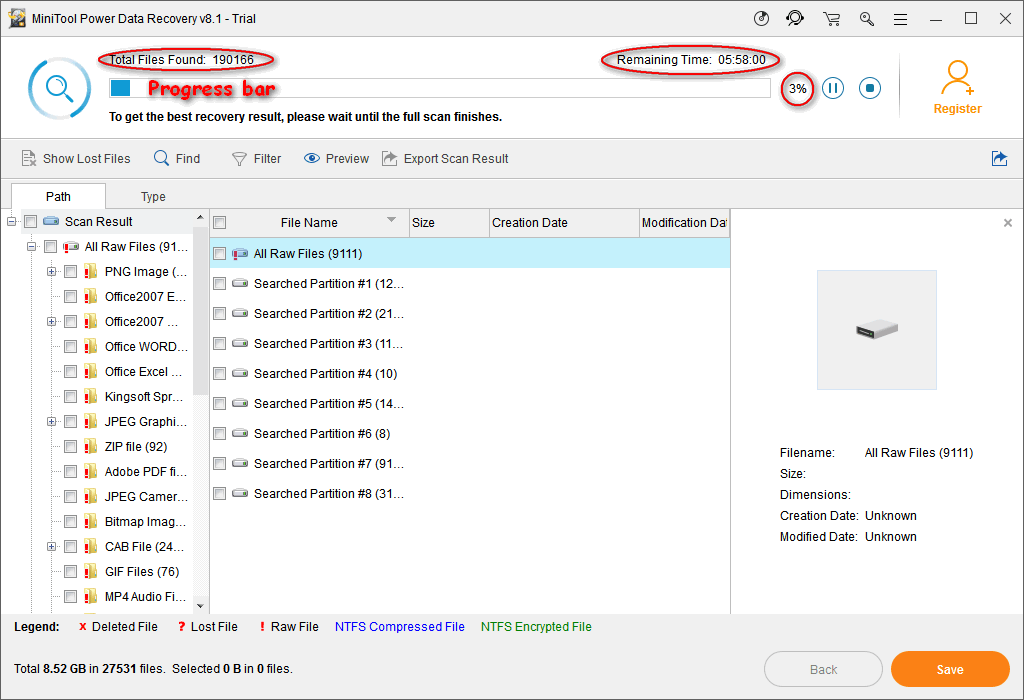
Step five: you’ll see a progress bar now which indicates the progress of the scan. Besides, you’ll see the following information on the same page.
Certainly, these types of information will be constantly changing.
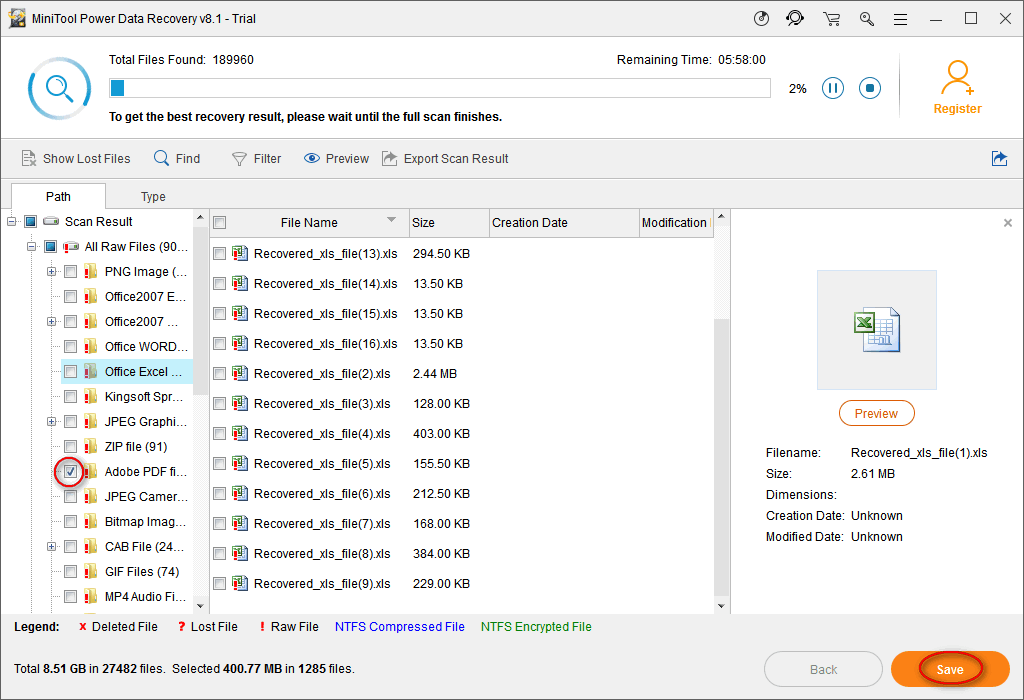
Step six: now, you can expand the found partitions and folders to see whether your needed files are contained.
What happens after you click on Save?
That’s all I want to talk about the data recovery from the inaccessible drive.
After that, I advise you to backup data (at least the important files) on your drive with a reliable tool like MiniTool ShadowMaker, as I have suggested earlier. Please click here to know how to create automatic file backup in Windows 10.
FYI: there are mainly 3 cases in which you can’t access your drive (hard drive or flash drive):
How to Fix Repair Drive Errors on Windows 10
The restart to repair drive errors on Windows 10 are talked frequently in 2018. Many methods have been put forward by different people to try to fix the error. Here, I summarize 5 methods to help you settle down the repair this drive problem easily.
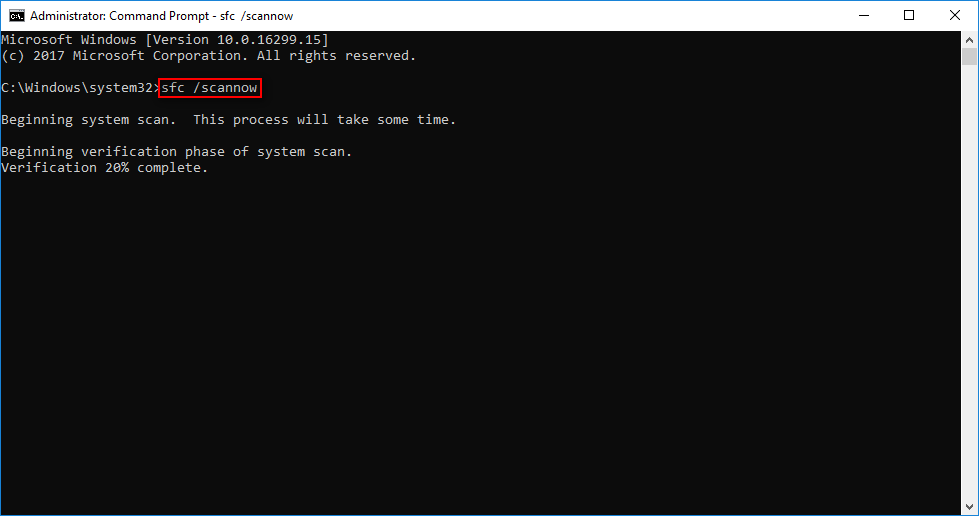
Method One: Run SFC – System File Checker Tool
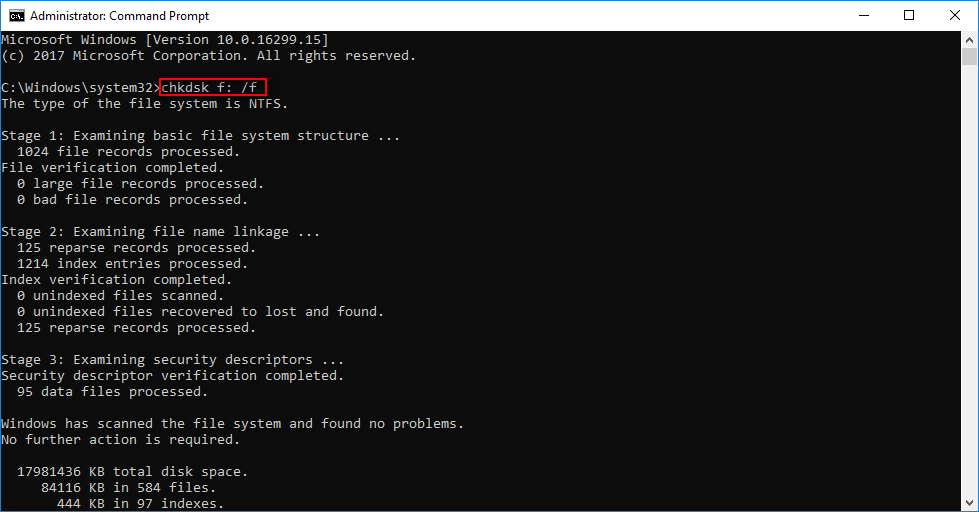
Method Two: Run Check Disk
Please note: the CHKDSK command will clean up disk-related errors on your PC, but it may delete your data. Click here to know how to recover data after CHKDSK.
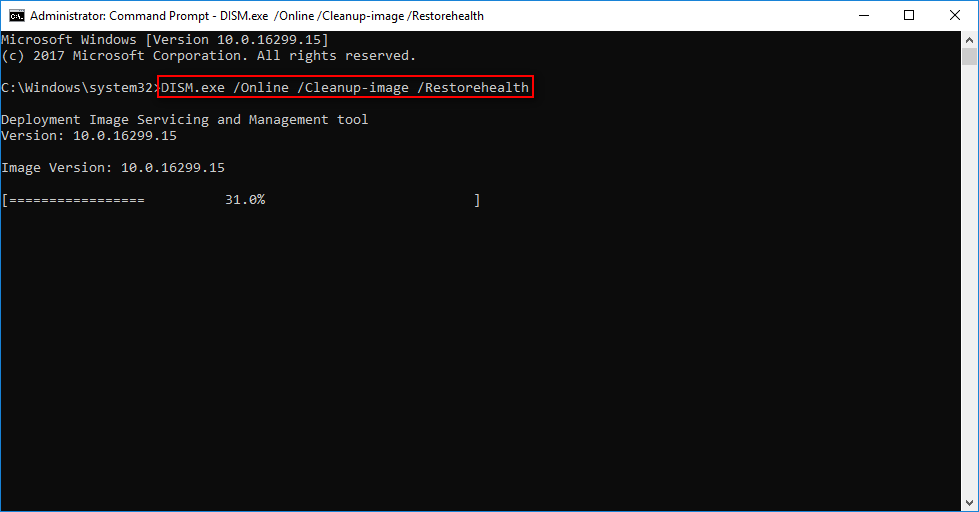
Method Three: Run DISM
Please note: sometimes, the DISM may fail to get the files. At this time, you may turn to the USB or DVD for help.
Method Four: Automatic Repair or Startup Repair
In this method, the Windows bootable installation CD/DVD is necessary, you need to find it and make it ready for use.
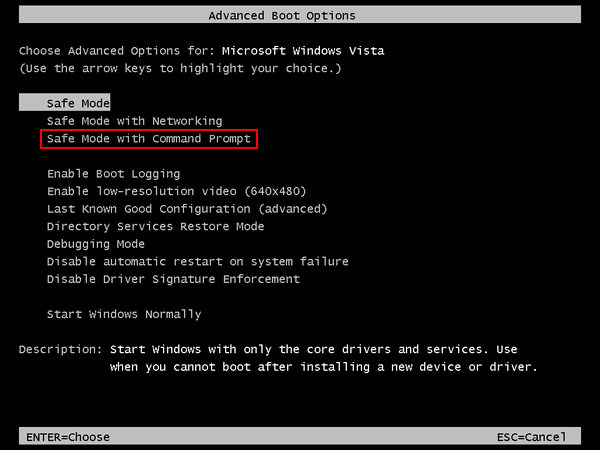
Method Five: Execute System Restore in Safe Mode
With the help of System Restore, you can bring your computer back to a point before the restart your PC to repair drive errors appear (you can recover files after System Restore if any important data are lost).
How to run system restore in safe mode:
That’s all I want to talk about how to repair drive errors on Windows 10. If you have other good suggestions, please leave a message below to help more people.
Final Words
A lot of users reported that the “Restart to repair drive errors” keep showing up even after a reboot. Generally, it occurs after or during the use of error checking tool. Well, how did this issue arise exactly? In fact, there are many reasons that could be responsible for such errors:
The root reason is actually – the loss of access to data saved on a Windows PC. Since you know you can’t access your files successfully when the error appears, you should try every possible means to recover data from it at once.
Then, I also advise you to make a backup of the significant files so that you won’t be affected when necessary files are lost in the future.
In the end, I provide you with five practical ways to fix the error you have met. These methods are said to have helped many people get out of the repair this drive error. Hope they also work well in your case!
ABOUT THE AUTHOR
Position: Columnist
Sarah is working as editor at MiniTool since she was graduated from university, having rich writing experiences. Love to help other people out from computer problems, disk issues, and data loss dilemma and specialize in these things. She said it’s a wonderful thing to see people solving their problems on PC, mobile photos, and other devices; it’s a sense of accomplishment. Sarah likes to make friends in life and she’s a huge music fan.


